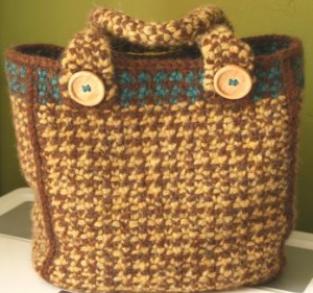
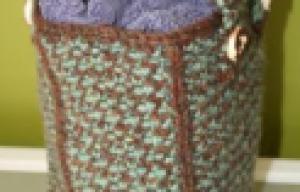
The Ferla Box Bag was inspired by a desire to recreate my favourite bag, bought in Italy some years ago and slightly past its best, in knitted form. This project has been in the development since October last year but is now with pattern testers so should be ready for release soon.
Originally I thought it would be an opportunity to work with some wonderful tweedy yarns I’d been given that weren’t really suitable for clothing. I’d swatched and tried to felt them but whilst they didn’t felt they bloomed and softened beautifully once thoroughly washed and soaked – still not soft enough for clothing but perfect for a bag that needs to be a little more sturdy.
This yarn was knitted up in four strands of 4 ply in a broken slip stitch rib pattern so the finished bag would hold its shape and not stretch too much – especially important for the short handles.
I was pleased with the results and when my 7 year old niece admired the bag, I decided to try a lightly felted version, using some jewel coloured mohair held double, as a book bag for her Christmas present. Again it worked out pretty well so her older sister got one too.
Once I got started, new possibilities kept revealing themselves to me and I couldn’t stop – again lightly felted versions made with stash lopi (left) and Drops Eskimo (right).
The most recent version I’ve made is from a 1970s vintage Littlewoods Keynote Shetland in brown with subtle hues of gold, blue and purple, matched with the mustard coloured Jamieson and Smith Aran. I ran out of the Jamieson and Smith yarn so added in the turquoise from my stash.
I think these yarns work really well for this particular project and they have come mainly from my stash. I’d hate to think how long ago the sheep (and goats) gave up their winter coats for some of these yarns to be made, but I hope they’d think it was worth it in the end!
I’ve finished my bags with vintage buttons at the base of the handles, these are optional but given I love vintage buttons, I think they’re the perfect finishing touch.
Additional knitting information
This bag requires 100% wool yarns that will full and bloom or felt; this combined with the stitch pattern makes the finished knitted fabric nice and stiff so it will stand without support and hold its shape. Superwash wools are not suitable for this project. Alternatively the mohair versions were made with vintage mohair which calls for 5.5mm/US9 needles with a high wool/mohair content.
I’ve used a range of yarn weights – the first version is knitted from 4 strands of 4 ply shetland, the lopi bags from a single strand of bulky yarn and the Littlewoods and Jamieson and Smith version was knitted with three strands of the Littlewood Shetland DK and two of the Jamieson and Smith Aran. These were knitted on 5mm/US sized needles. For the mohair bags I knitted the mohair double stranded on 5.5mm/US9 needles.
The cast on for the base generated much discussion among testers. I originally used a two needle or knit cast on as this creates lovely loops when I do it, which are perfect when you pick up around the sides of the base. although not for much else!). However it didn’t work for everyone. This is how it looks when I do a two needle knitted cast on:
You can see the loops along the bottom that you later knit into to pick up stitches. If this doesn’t work for you a provisional cast on may be better, and the best would be Judy Beckers Magic cast on – this will give you to sets of live stitches and the number of main coloured rows at this side will match up better with the number at the opposite side once you’ve picked up. Judy’s magic cast on is demonstrated wonderfully here by Cat Bordhi.
Waltraud, one of the testers who didn’t like this cast on reported back:
As you probably remember, I had troubles with the knitted cast-on, so I checked what a few authors say about it. Stephanie Pearl McPhee thinks, it gives a very tight cast-on and rarely uses it. Maggie Righetti (Knitting in plain English) thinks it’s the spawn of the evil and strongly recommends against it as she
finds it does give an extremely tight cast-on. Mary Thomas uses knitted cast-on for the cast-on that is worked into the stitches. She thinks it gives a nice and elastic cast-on.
So I may well be in the minority here…
Felting/fulling
I’m always unsure about whether to use the term ‘felting’ or ‘fulling’. Felting is pretty widespread but I believe that technically, felting ready spun yarn is fulling (and felting is appropriate for unspun fiber). Anyway…
If you have a top loading washing machine you might like to felt in the machine checking as you go how much it has felted and stopping once you’re happy with it. I do it by hand as I have a front loading machine and don’t like to put my knitting in and hope that it will come out how I want at the end of the cycle. Felting it by hand means you can decide when to stop.
I use a very simple approach to handfelting, similar to that you would use for making felt from roving.
Key to the process is hot water, agitation and soap. I use olive oil soap that comes in a big block grated into hot water using a cheese grater. Others use dishwashing soap.
Put your knitting in the hot soapy water and start agitating. I use a motion not unlike kneading bread and it can get a bit physical with all that scrunching and squeezing. The Knit Picks video tutorial linked below recommends a ‘brand new, clean as a whistle, toilet plunger’. This sounds ideal, especially if you’re using the recommended bucket, but I felt in the bathroom sink where the introduction of a plunger would probably mean water everywhere apart from the sink! Now if I had a nice deep Belfast sink….
I keep going with the agitation until the fabric of the bag noticeably starts to stiffen, checking as I go along – over felting will reduce the stitch definition so it’s a fine line.
When I think it’s about right, I drain the hot soapy water, squeeze the excess water from the bag and then run a sink full of very cold water. I then put the hot wet bag into the cold water to shock it a little and to rinse out the soap. A little more agitation and I let the water drain again, squeeze out the excess and transfer the bag to a dry towel, wrap it up and squeeze as much water out as possible.
For final blocking the bag should be stuffed into shape with a folded towel or, if you have one the right size, a shoebox inside a plastic bag. The bag should be sat upright in shape on a towel to absorb the water that will drain to the base as it dries.
Here’s a link to the Knit Picks website which has tutorials for hand felting and the video featuring the plunger and machine felting using a top loading washing machine.
Mohair
In felting mohair there are a couple of additional steps I use to reduce the fluffiness of the finished article and to prevent the stitch definition being lost in the fluff.
Basically I shave the knitted bag with electronic hair clippers before felting, and then again after. If you don’t have electronic clippers, a disposable safety razor can also be used to shave the fabric to reduce excess fluff. Do be careful when using either that you shave along the surface and don’t cut into the fabric
The picture on the left shows the bag fabric as knitted. The picture on the right shows the bag once it has been shaved.


So if you have any vintage, slightly scratchy wool or fab coloured mohair that you just don’t know what to do with, why not give it a go. I’ll post up more details when the pattern is released.


I like these bags! … and I think I have the perfect yarn for them……. 😉
Very nice indeed!
Anne-Lies
Love the stitch pattern. They’re kind of wonderfully tweedy.