Whether it be a complete brightening up, a bit of overdyeing, or trying to blend with an existing yarn, a bit of DIY yarn dyeing can turn what you already have but don’t love into something you do, and that you can’t wait to use. It can enliven your stash making it more flexible and more aligned to the projects you actually want to make.
We all have those yarns that we don’t quite remember why we bought them, that were well meaning gifts, or that were such a bargain that we couldn’t pass them by, until we got them home that is, where they now languish reproachfully.
I was prompted to revisit the draft of this post about home yarn dyeing, which I had originally started back in 2017, after I decided to dye some yarn for recent projects. Both the 2017 dye project and my more recent ones were inspired by a desire to take what I already have and bend it to my knitty desires.
Firstly though, I’d like to acknowledge that there are some amazing professional dyers out there who do fabulous things with colours and are true artists in their own right. They beautifully cater to our every colour whim and introduce us to new colour combinations and dye effects we’ve never imagined. They fuel our passions and take us out of our comfort zones as we exclaim, ‘I never thought I’d like this, but…’ or, ‘I never thought speckles were me, but when I saw this, I just couldn’t resist’. This post is not about trying to create those types of yarn.
Today I will be talking about some much more modest approaches to yarn dyeing that can be undertaken with a minimum of equipment and financial outlay using food grade dyes. The virtue of these approaches is, I think, their simplicity and accessibility. However, based on the principle of getting out what you put in, the effects are also quite basic, but I do think they are rather effective nonetheless. I’ll share both the yarn produced and how they knit up, as well as a project made from some of my oldest hand dyed yarn that was added to my Ravelry stash back in 2010!
The first approach uses a microwave and the second the stovetop. This type of dyeing is basically the fixing of colour through heat and works on animal fibres like wool, but not plant fibres such as cotton. Kool Aid is popular for home dyeing because it’s readily available in the US – Tesco had it in the Uk for a while but I’m not sure if they do now, but it can be bought online. You need the dry sachets that you would mix to make the drink, not the readymade drink which has sugar. Kool Aid also has lots of citric acid which will fix the colour on animal fibres, which also makes it easy to use.
If you mix Kool Aid with food colouring you probably won’t need to add extra acid. If you use regular food colouring like those mentioned below, you will need to add with some citric acid or vinegar to fix the colour, it doesn’t take a lot – about a tablespoon of vinegar or teaspoon of citric acid per 100g of yarn is a good starting point. If once hot the dye bath/water isn’t clearing and the yarn isn’t as colour saturated as you want, you may wish to dilute and add some more acid to see if that helps, but err on the side of caution.
Also, please note: these colouring will stain worktops, wooden spoons, skin etc. so do take care.
So, let’s start with the 2017 dye project.
Dye Project 1: Two Colour Microwave Dyeing

The yarn I dyed here was a superwash 4 ply/fingering that had been dyed previously with no particular project in mind and with even less experience than I brought to the task this time. Both skeins, one red and the other green, were semi-solid colours and not the most interesting. What prompted me to re-dye them was the fact that I was on my third Barn Raising square blanket, and was getting incredibly low on sock yarn leftovers.
If you haven’t knitted one of these blankets I’d really recommend it, and if you’re skeptical about so much random colour together you could do what I’ve done and edge each square with the same solid colour to ‘frame’ each of the brightly coloured centres. Because the squares are knit from the centre out, this means just working the last few rounds, 6 in my case, in the contrasting yarn.
The blankets I was working on at the time were for babies who were imminent and so speed of completion was of the essence. I could have knitted a a squares worth out of each skein of sock yarn I had in my stash I suppose (although those too were pretty low at the time) but there’s something that just doesn’t feel right about taking such an approach to a ‘leftovers project’.
Anyway, I had this yarn in my stash and it wasn’t being used, and was unlikely to be used as it was, because the colours just didn’t do anything for me.
Having been dyed previously did limit my options colourwise because I needed to work with what I’d already done rather than working with a blank canvas. So this is what I did…
- I wound the yarn balls into long skeins, tying them in several places so the skeins didn’t get into a tangle.
- I then soaked the skeins thoroughly.
- Meanwhile I made up my dyes in litre jugs.
- for the green skein I used a blue food colourings mixed with Kool Aid blue and a green food colouring – the Langdale brand
- for the red skein I used a mix of yellow colouring and orange Kool Aid, and cherry Kool Aid
- I then placed two plastic take away food containers inside a rectangular pyrex glass dish.
- Then one of the skeins of yarn was put into the plastic containers, half in each.
- One jug of colour was poured into each of the two containers and where the skein transitioned from one to the other, the yarn was wiggled back and forth to make sure it was absorbing colour.
- The glass pyrex dish and all the contents were then put into the microwave and heated for a couple of minutes at a time until the water was largely clear – it will get hot, so do be careful.

Once the yarn had absorbed the colour I left it to cool down completely, then rinsed it and hung it out to dry in the sun. Then I moved on to the second skein using the same process. In this picture you can see how long the skeins were and how the colour was distributed along them.

Using food colours can be a little unpredictable because because colours like green for example are secondary colours, a composite of primary colours which can ‘split’ into their constituent parts, and different brands use different formulations. For example, some greens will split and a strong blue will dominate, the Supercook brand was very blue (see below left) whilst the Langdale green was very yellow/orange when it split (see below right). You can see how this played out on the skein above and knit squares below.

I was really please with the transformation in these skeins. Interesting, while the contrast in the skein looks really strong, this is how they knit up in Barn Raising squares. The colours are much more tonal than you might at first think:


Dye Project 2: Stovetop tonal ‘kettle’ dyeing
During lockdown I’ve been exploring my stash and planning summer knits. This took me into the lace section of my yarn stash where I had a beautiful skein of Flamboyance yarn sheer. As stunning as this was – and it was – cobweb lace isn’t really my thing so I thought about holding it double with another yarn. Also in my stash was an unknown bubblegum pink cobweb yarn that I inherited from a family friend and dates back to the 1970s. Now, anyone who knows me knows that the chances of me knitting up bubblegum pink yarn is pretty slim. This is how the yarns looked together; how PINK is that pink?

So my plan was to bring these two a little closer together. This second dye project was done on my stovetop as our ancient microwave did not make the move with us.
So I:
- Soaked the yarn.
- Mixed a combo of cherry red, yellow and orange Kool Aids together is a jug.
- Put the dye in the stainless steel frying pan and then added the soaked yarn.
- Turned on the heat and using a low heat gently allowed it to heat to a simmer.
- Once the colour had exhausted I let it cool to hand hot then wrung it out a little and decided it needed more colour.
- Mixed more dye, adding grape this time – a dark purple – and repeated the heating process.

Second time round I was much happier with the colour. Allowed the yarn to cool, rinsed it and hung it out to dry. This is how the pink looked after dyeing (skein on the left). It was tonal, brighter than the Flamboyance but I was pretty happy with it.

I held the yarns together and swatched with it. I wasn’t able to get the gauge for the pattern I had in mind but did like the fabric I got on a 4.5mm (US7) needle. So instead I started looking for a pattern I liked that had the same gauge as I had achieved on a 4.5mm needle and came up with Joji Locatelli’s Lihno pattern.

I was really pleased with how this came out. This picture above is a true representation of the colour while in the slightly over exposed picture below you can see more easily the tonality of the yarn, with even a little of the pink peeking through, but also how nicely these cobweb lace yarns knitted up together in both the lace section and the raglan increases on the left and right; the stitch definition is really crisp.

This is already in regular rotation in my wardrobe.
The final project I want to share has also been much worn. It was also a product of that rummaging in the box of lace yarns. In there were three cakes of 2 ply lace yarns that were reclaimed from a charity shop sweater, my stash tells me 10 years ago, and used for experimental dyeing with Kool Aid and food colouring. Because the yarn was used for experiments there were only small amounts in each colour, so rather than try to do any planning I went for the colour blocking approach; starting with the purple, knitting til it was done and repeating.
The pattern was based on Canadian yarn shop L’Espace Tricot‘s, Gracious pattern, available from Ravelry, with a few modifications.
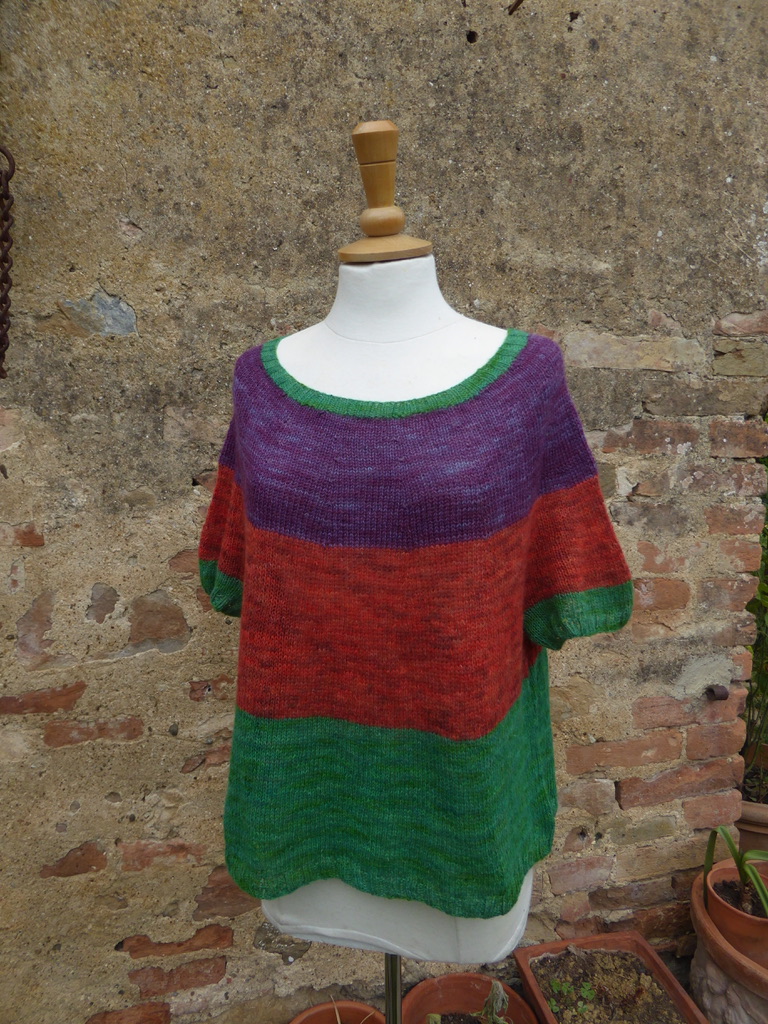
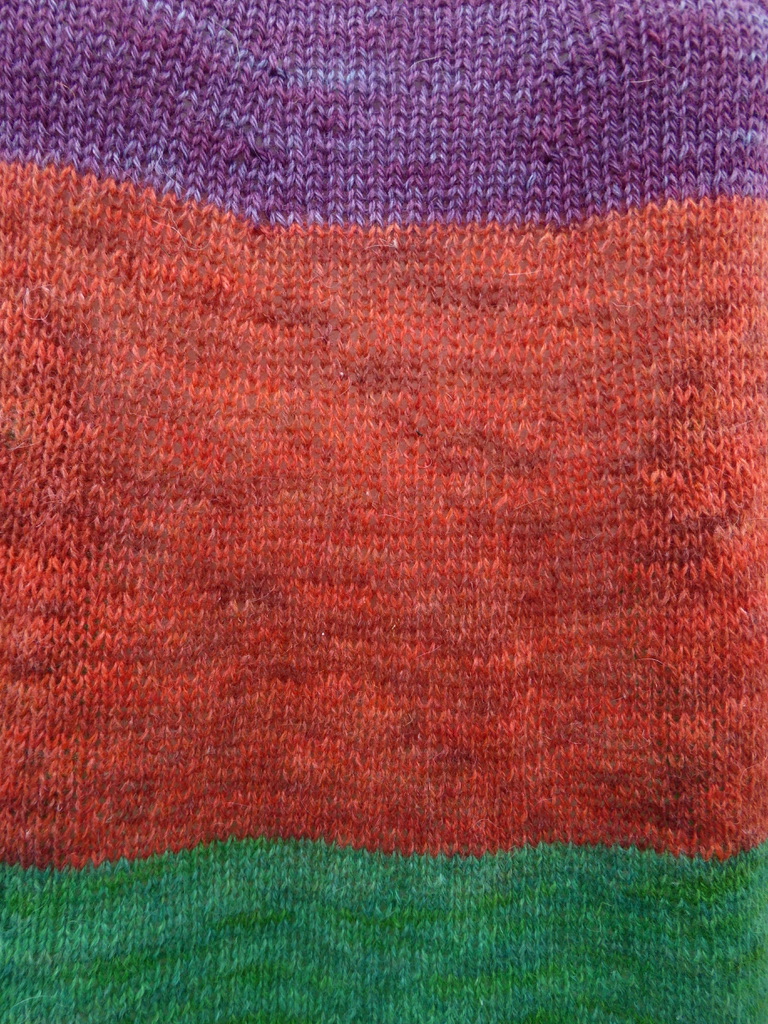
Worked on a 4mm (US6) needle the 2 ply laceweight knit up into a lovely loose airy drapey fabric and I love how bold the colour blocks are. Again some very different tonal yarns that have been languishing in the stash turned into a garment I love and have been wearing loads. Here’s a close up of those wonderful tonal colours:
If this post inspires you to have a go at dyeing with food colouring – this is the original Knitty article on which I based my early Kool Aid dyeing experiments, but googling to locate it, I see that there are now many more ‘how to’ tutorials and You Tube video’s you can refer to for both Kool Aid and food colouring.
I hope you have fun, let me know how you get on,
All the best,
Tess xxx
Discover more from
Subscribe to get the latest posts sent to your email.